
A tutorial provides your target users with their first experience of your software. Typically, when users encounter a tutorial, they haven’t actually used your software but are intrigued enough to give you their attention for a few minutes. To reach users, the experience must illustrate how your software takes something that is awful about their workflow and transforms it into something that just seems to work the way it should.
Plain and simple, during this early phase of the prospective user’s journey, a quick tutorial will help them decide if your product will solve their problem.
Tutorials go hand-in-hand with two other types of documentation: an onboarding guide and feature documentation. A great tutorial supported by a bullet-proof onboarding guide and detailed feature documentation provide a complete introductory experience designed to encourage further engagement with your product and cultivate some help driving awareness.
Think through the typical workflow for your target user. Add to this a broader consideration for the environment in which they work. What department are they in? With whom do they collaborate regularly? Meet them where they are with an experience that is familiar and enables them to envision how they would use your software in their current work environment.
Provide an expertly guided experience with nothing left to chance or interpretation. Explain the purpose of each step, provide copy/paste code, show clear screenshots, and show what success looks like for each step with sample output or more screenshots. Users should always know exactly where they are in the experience you’ve laid out and precisely what action they need to take next.
Provide a hands-on experience that is familiar, but which illustrates how your product transforms their workflow to work they way it should.
The point of a tutorial is to get users interested enough in your product to experiment outside of the guided experience you have provided. Go beyond the tutorial itself with detailed feature documentation. Be mindful of the questions users are likely to have as they engage with the tutorial and provide feature documentation that enables users to find answers to the questions they have. Make users self-sufficient as they explore the range of functionality your software provides.
To provide concrete examples of the guidelines above, we’ll walk through a brief tutorial from start to finish. Along the way, we’ll peek at a supporting onboarding guide and some feature documentation as well. Each of those will be the subject of their own deep dive in upcoming articles, but we’ll do a little intro to each as we discuss how to write an impactful tutorial.
You should begin a tutorial by establishing shared context with your target users. Describe what you know about their workflow in just enough detail to convey a familiar understanding of what working in their role is like. Take care to describe the problems you are going to address in the tutorial in a way that resonates with your target users.
As an example of how to do this, let’s take a look at portions of a tutorial developed by a startup company called Arrikto as an introduction to Kubeflow and Kale. Kubeflow is an open-source machine learning platform built on Kubernetes.
Kale is a proprietary Arrikto component for Kubeflow that enables data scientists to run scalable machine learning pipelines in Kubernetes clusters from within Jupyter notebooks.
Jupyter notebooks are the most common environment in which data scientists work. Kale requires data scientists to make only simple changes in their workflow within notebooks in order to develop, test, and run production machine learning pipelines at scale.
Our example tutorial begins with the following introduction.
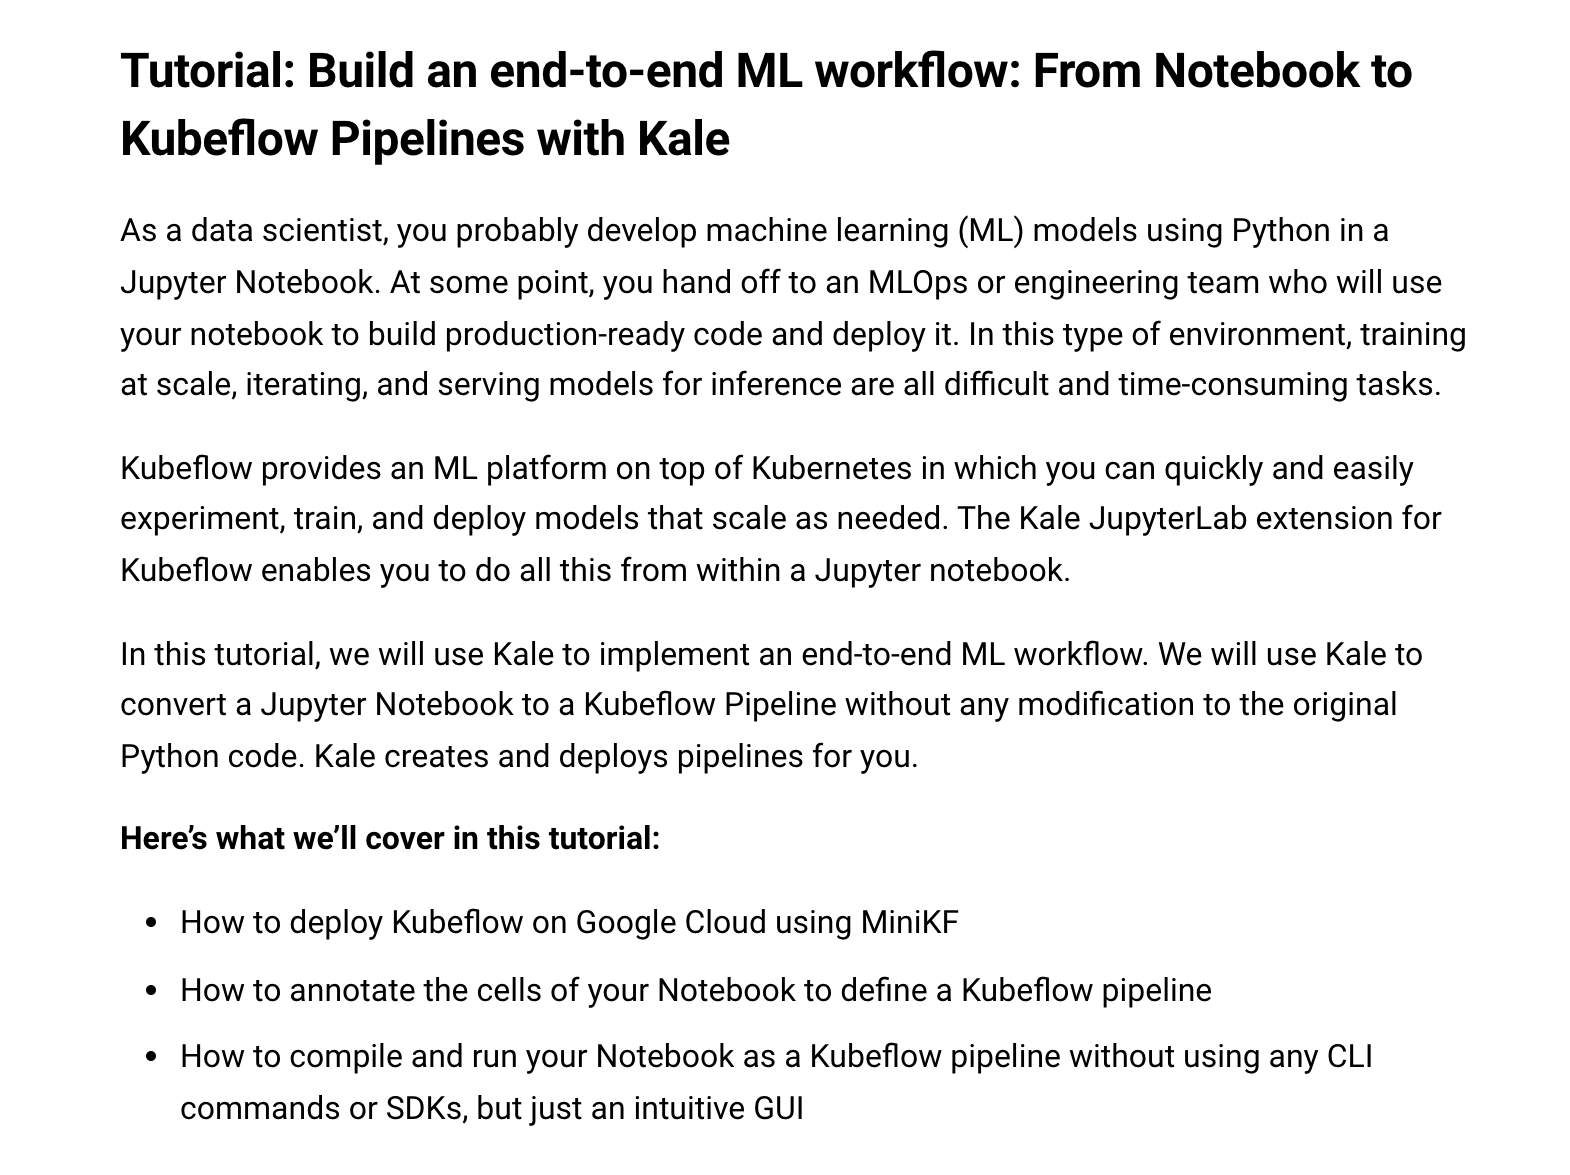
Unsurprisingly, this tutorial drives a huge volume of traffic to Arrikto’s trial experience. In just a few paragraphs, the authors make clear who their audience is, identify a major source of pain in the workflow of data scientists, and hint at a solution that really resonates with data scientists.
Many data scientists spend most of their time working in Jupyter notebooks or other notebook environments in which they experiment and iterate until they are ready to try a model at scale. If instead of waiting for an engineering team to deploy their models in production, they can do so themselves all from within a familiar notebook environment, they can both work more quickly and develop better models, because they can test and iterate at scale.
Having read this introduction, a data scientist is likely thinking, “This would be amazing. I’m skeptical, but I’ll give you a little more of my time here. Show me.”
You will need to continue to show your users that you understand how they work and have a clear idea of how to improve their workflow as they move through your tutorial. Start strong as our example tutorial does in your introduction and demonstrate an obsession with the user experience throughout.
Developing a tutorial requires painstaking attention to detail. Having someone begin your tutorial is an incredible opportunity to win a new user and potential champion. Therefore you want to do everything you can to ensure that users who land on your tutorial finish it and have a rewarding first experience with your product.
Getting users to your tutorial in the first place, is another challenge. In a future article we look at how to drive traffic to tutorials and other educational opportunities.
In this section, we’ll focus on the fundamentals of keeping a user moving through your tutorial.
At the most basic level, your tutorial should provide an expertly guided experience that anticipates every screen, action, output, and potential points of confusion a user might encounter.
You need to put yourself in the mindset of a person who has never previously seen any of the software that you are going to walk them through. Even if you need to guide them through third-party software such as a cloud platform in which your tutorial experience is deployed.
Users, no matter how expert, are neither insulted by nor do they find it tedious to read through prescriptive instructions that assume no prior knowledge. I have never had a user complain that a tutorial was remedial or moved too slowly. I have, however, seen hundreds and even thousands of users abandon a tutorial because we failed to explain or illustrate a step with enough clarity for beginners or because we failed to call out a potential source of confusion and guide users around it.
With each step a user takes, their confidence in your ability to guide them should increase. At a minimum, you must:
Continuing our discussion of the Kale tutorial, let’s look at an example. The first task users are asked to complete in this tutorial is deploying Kubeflow on Google Cloud using MiniKF. (MiniKF is a trial version of Kubeflow.) This is accomplished by means of an onboarding guide. We’ll look at a sample of steps from this guide as illustrations of several of the points above.
To get started, please review how the authors have documented Step 3 and then take a look at my comments below.
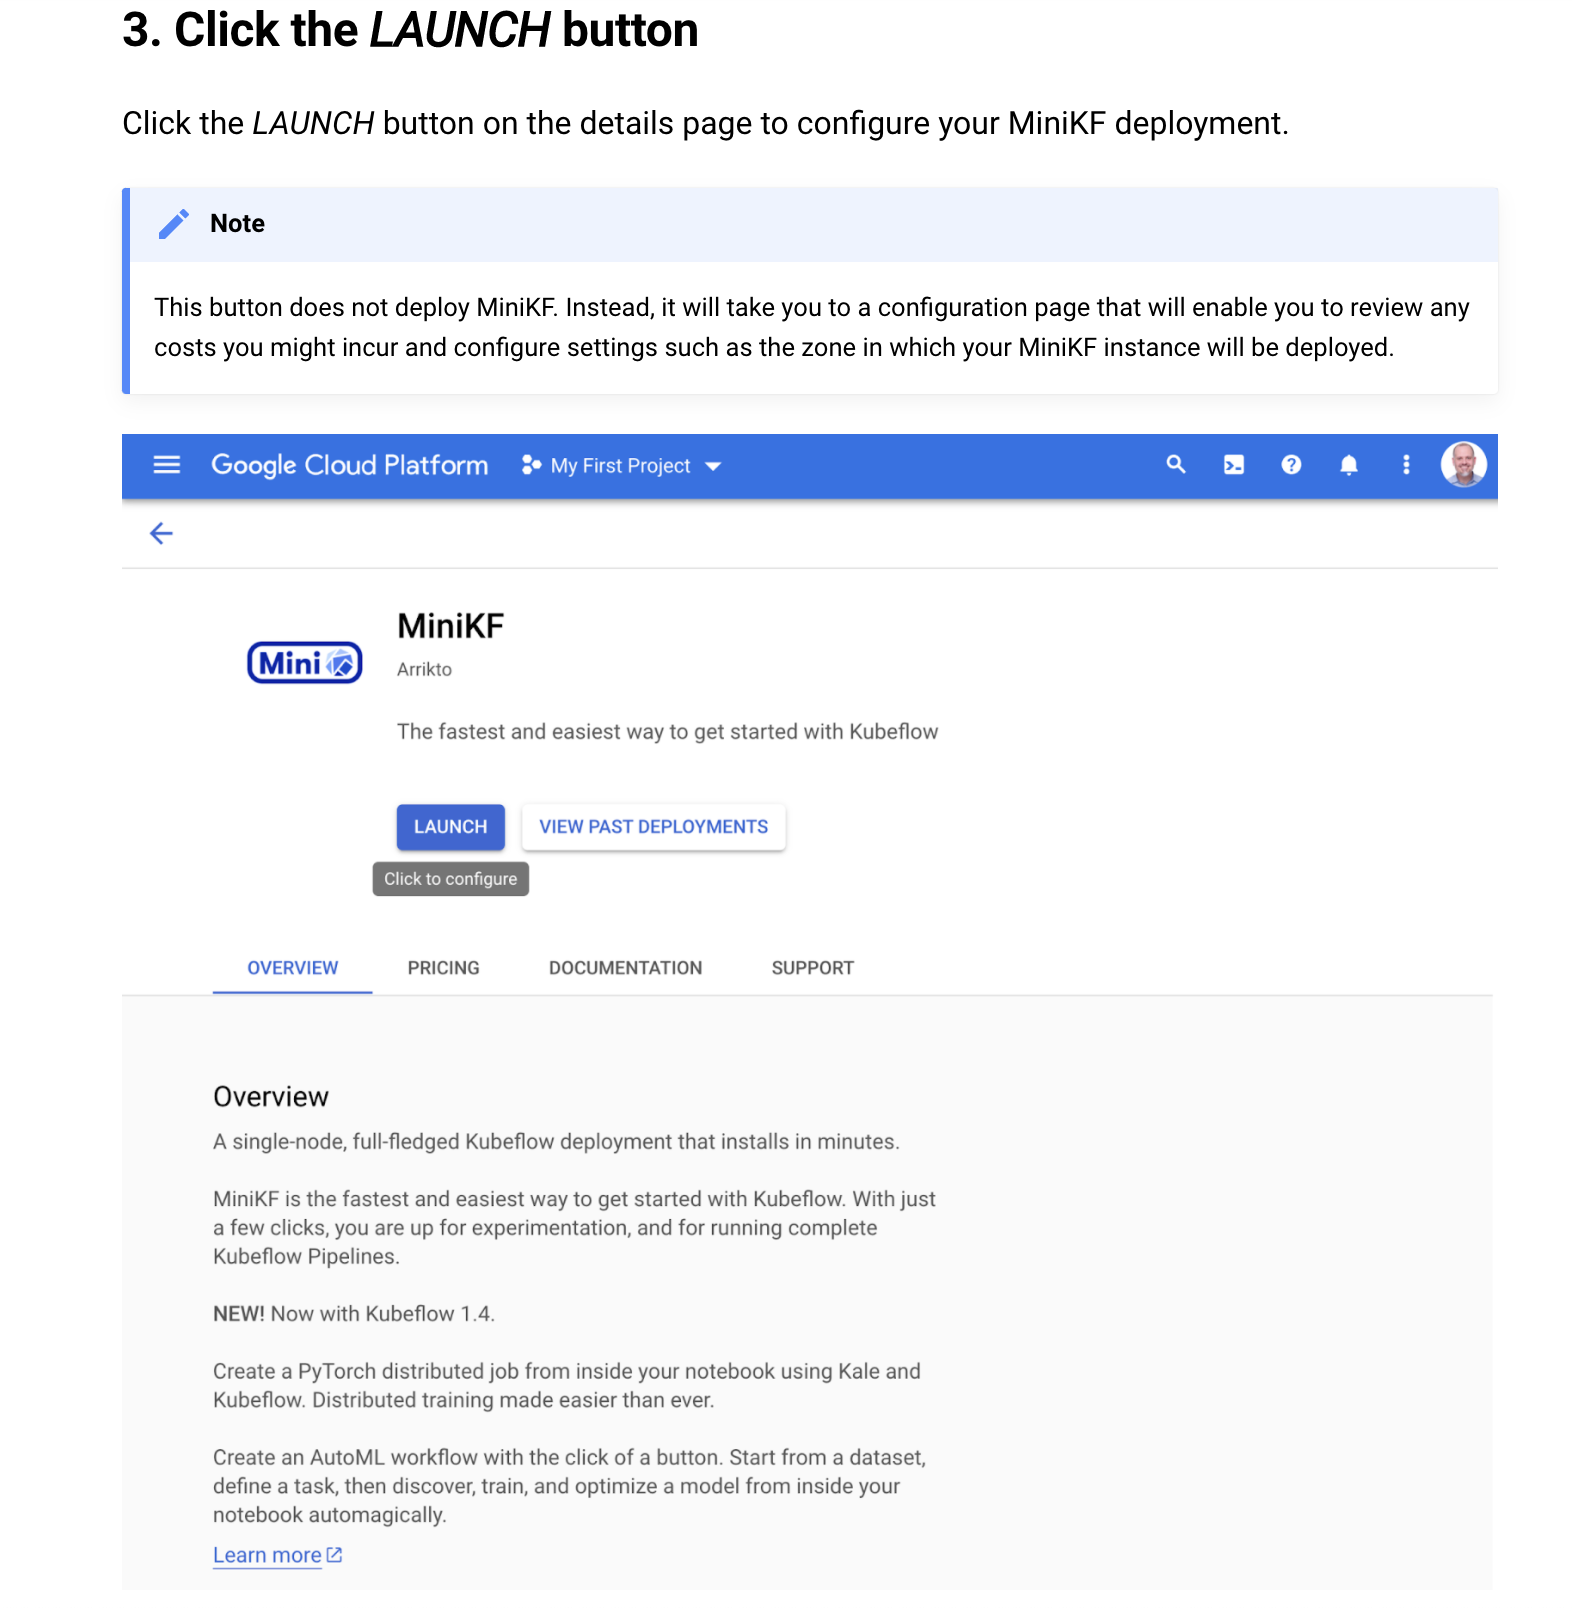
For Step 3, I want to call out the note the authors have included regarding what happens when you click the LAUNCH button. This button is a potential point of confusion for users, especially for those who are new to Google Cloud. These users might be uncomfortable clicking a button labeled LAUNCH, without first seeing a configuration screen and costs (the next screen).
Essentially, the authors are documenting around a product problem in Google Cloud, albeit a small one. CONFIGURE would be a better label for this button. For now, though, users need some reassurance that they can safely take the next step.
Challenge: Large product problems create a more obvious need for good documentation. However, it is often necessary to carefully consider very small product problems that can confuse or create friction for users and guide users past these points in their product experience.
Next, review Step 4 then have a look at my comments below.

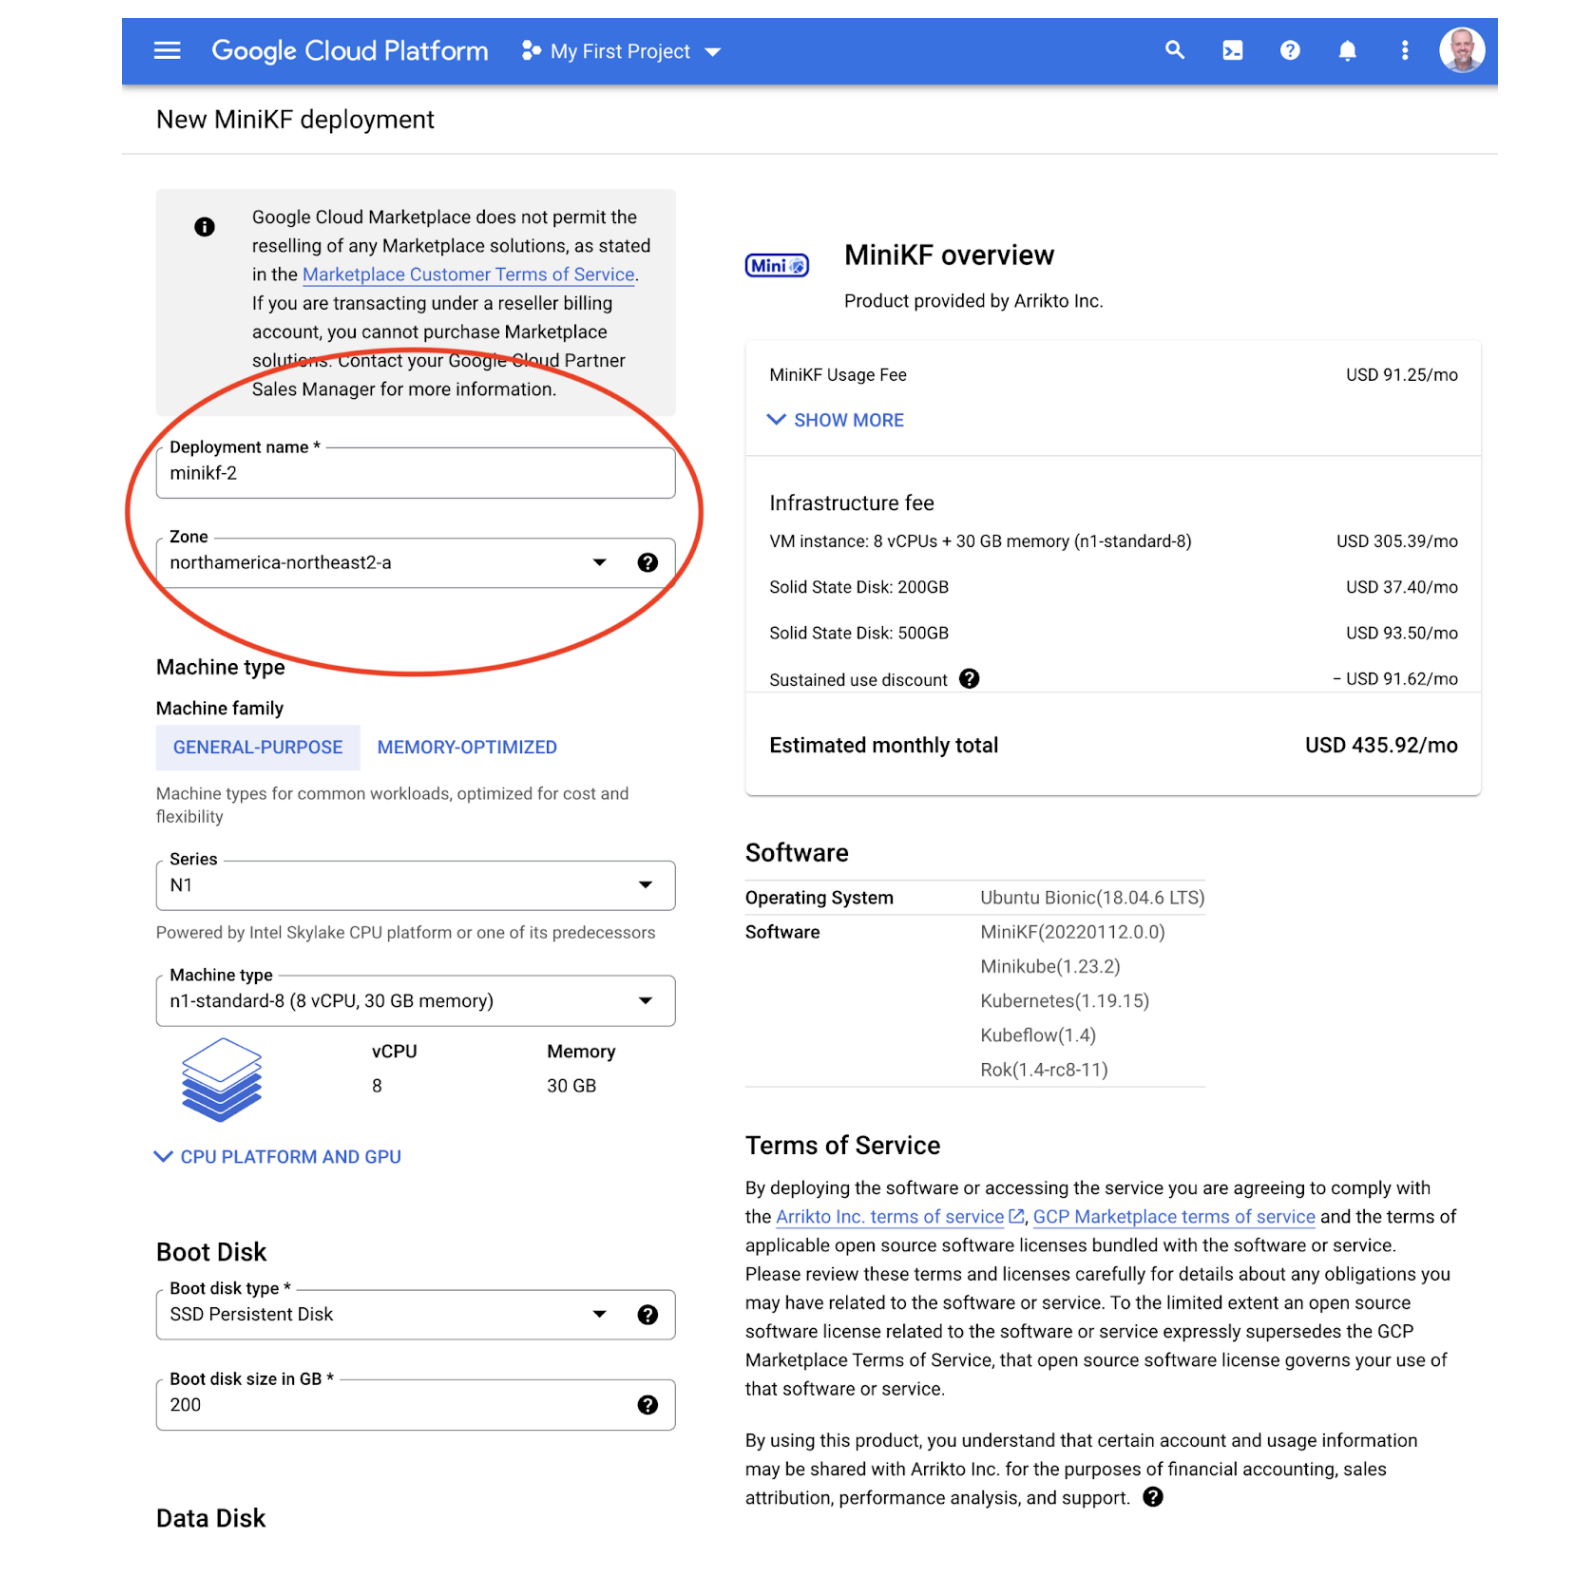
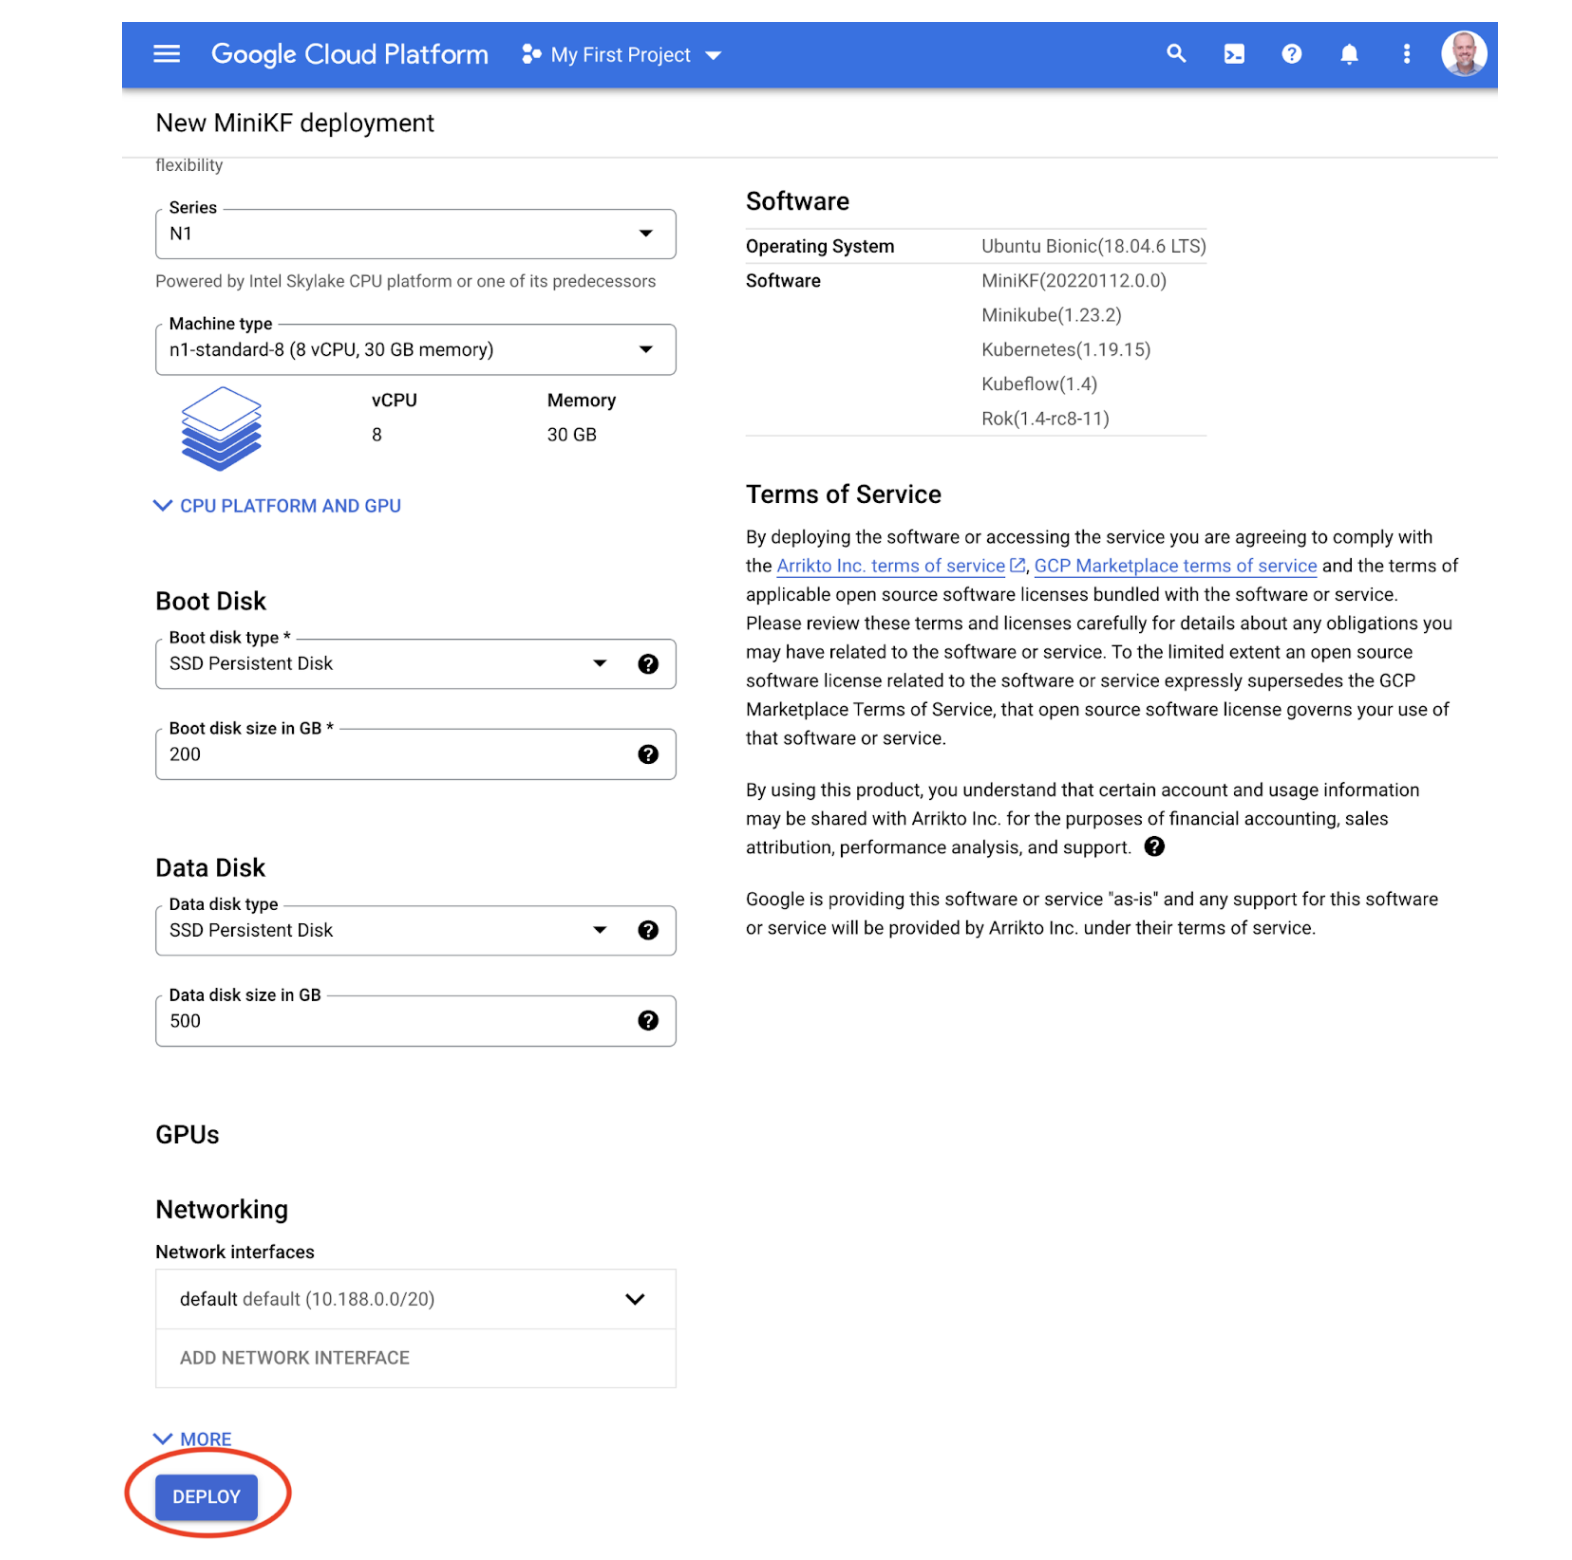
Step 4 illustrates two more common challenges in writing a tutorial.
To address these challenges, the authors have done a nice job here. They tell users they need to review and possibly modify only the two values at the top. They also name the fields and illustrate where to find them with a screenshot that has the fields marked with a red oval. Finally, they give clear guidance about how to choose values for each of the fields Deployment name and Zone.
Now let’s turn to Step 5. After you’ve read it, please take a look at my comments below.
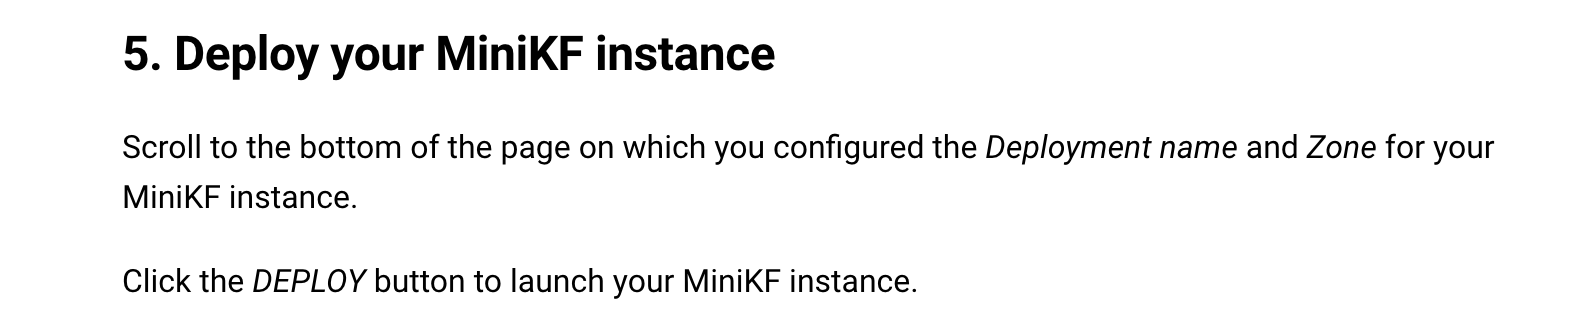
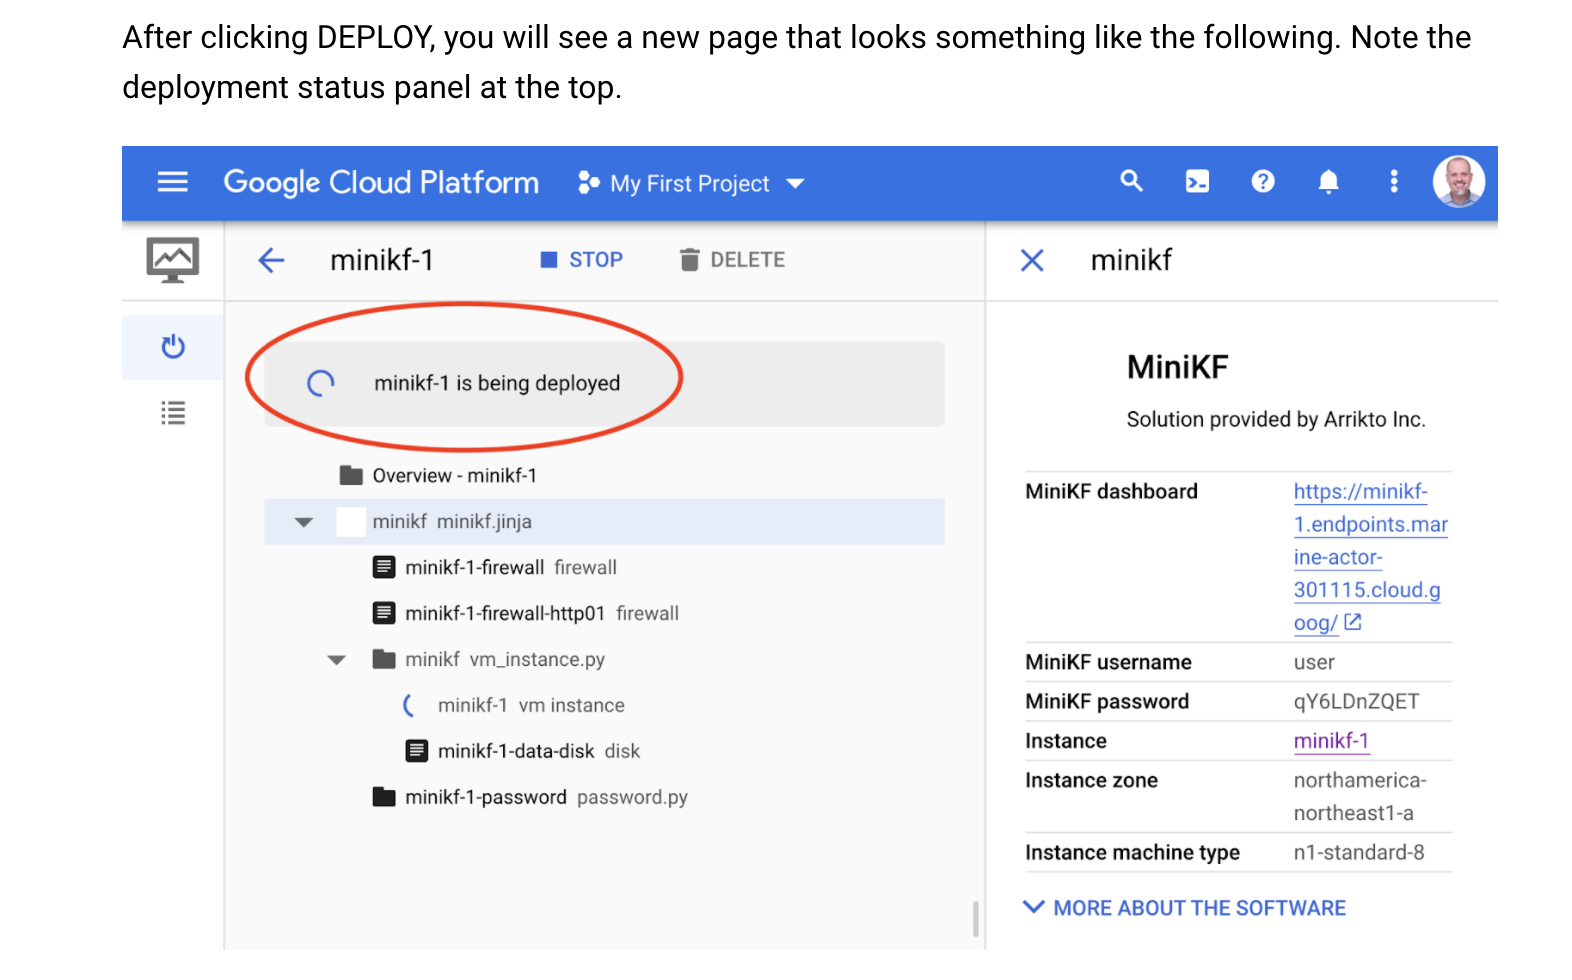
Step 5 illustrates a best practice that is important, but almost always overlooked by those who are new to writing tutorials. In this step, the authors ask users to perform an action (i.e. click the DEPLOY button) and then provide a screenshot that shows them what to expect after taking that action. It’s especially important here, because they want to point out that it takes a few seconds for MiniKF to deploy and where to look to see the deployment status.
In general, however, it is important to consider showing users what to expect after taking any action. There are questions I use to determine whether to include a screenshot or other example of expected output from taking an action.
If the answer to either of the above is true, in my experience, it’s necessary to include expected output with some explanation at the end of the step. Not only does this help avoid user confusion, but it helps users develop confidence that they can rely on your documentation.
In this section, I’ve illustrated how to cultivate confidence in your documentation through a few carefully chosen examples. These examples reflect some of the most important differences I’ve seen between tutorials that make users successful and those that users abandon because they grow uncomfortable or uncertain. Following just the few practices illustrated above will go a long way toward helping you write effective tutorials.
In a follow up article, we’ll dive deeper into onboarding guides. In that article we’ll cover more practices to follow when helping users onboard to your product with special consideration for early stage users such as design partners.
To understand the positive reaction data scientists have to the Kale tutorial, it is necessary to consider their workflow without Kale. Without Kale, data scientists are reliant on an engineering or MLOps team for training, testing, and serving ML models at scale and in production. This means that data scientists spend a lot of time waiting on another team to productionize their work so that they can move from development to training/testing, from any iteration following testing to new training/testing, and then from the last cycle of training/testing to serving their models for use in production within their organizations.
Once a data scientist has onboarded to MiniKF, the authors of the Kale tutorial move on to demonstrating how straightforward it is to create a production machine learning pipeline in a Kubernetes cluster from the familiar and comfortable environment of a Jupyter notebook. Let’s look at a portion of this part of the tutorial experience as an illustration of how to effectively persuade users that you can improve their workflow.
Creating a pipeline is largely concerned with defining independent steps that use the data produced from the previous step, perform a discrete task using this data, and then output data to be used by the next step in the pipeline. We’ll pick up the tutorial at the point where the authors explain how to perform this fundamental aspect of pipeline building using Kale.
At the point where we pick up the tutorial, users have downloaded and opened the provided Jupyter notebook. They have also done a little exploring to familiarize themselves with the machine learning problem this notebook addresses.
Please read through this portion of the Kale tutorial included below and then review my comments following the tutorial segment.

The authors of this tutorial made an interesting choice here that I think makes all the difference. They chose to use a real and fairly sophisticated machine learning example and fully configured the notebook so all the user really has to do is review and run it.
For the tutorial experience, they develop shared context by using an example from a well-known machine learning competition (Kaggle), by getting users into the notebook environment right away, and then having them run a few cells in the Notebook to get their hands dirty (not shown above).
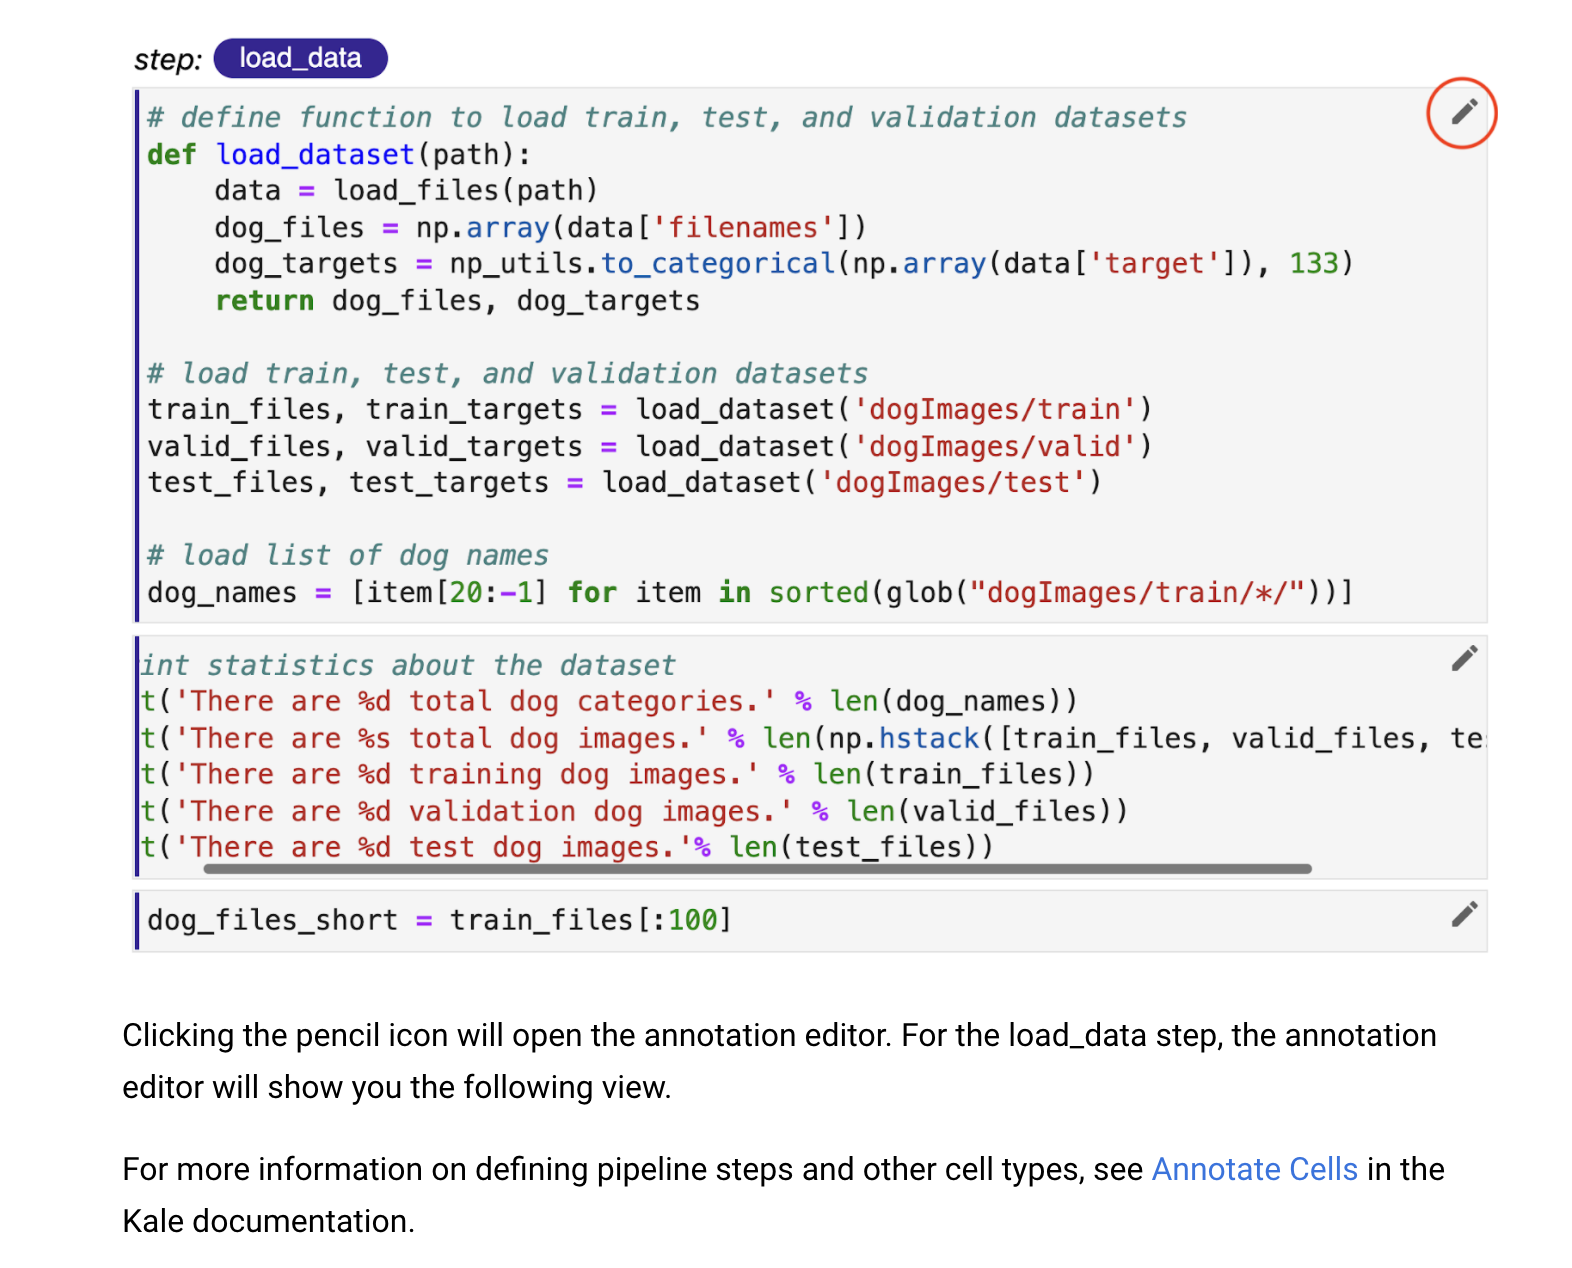
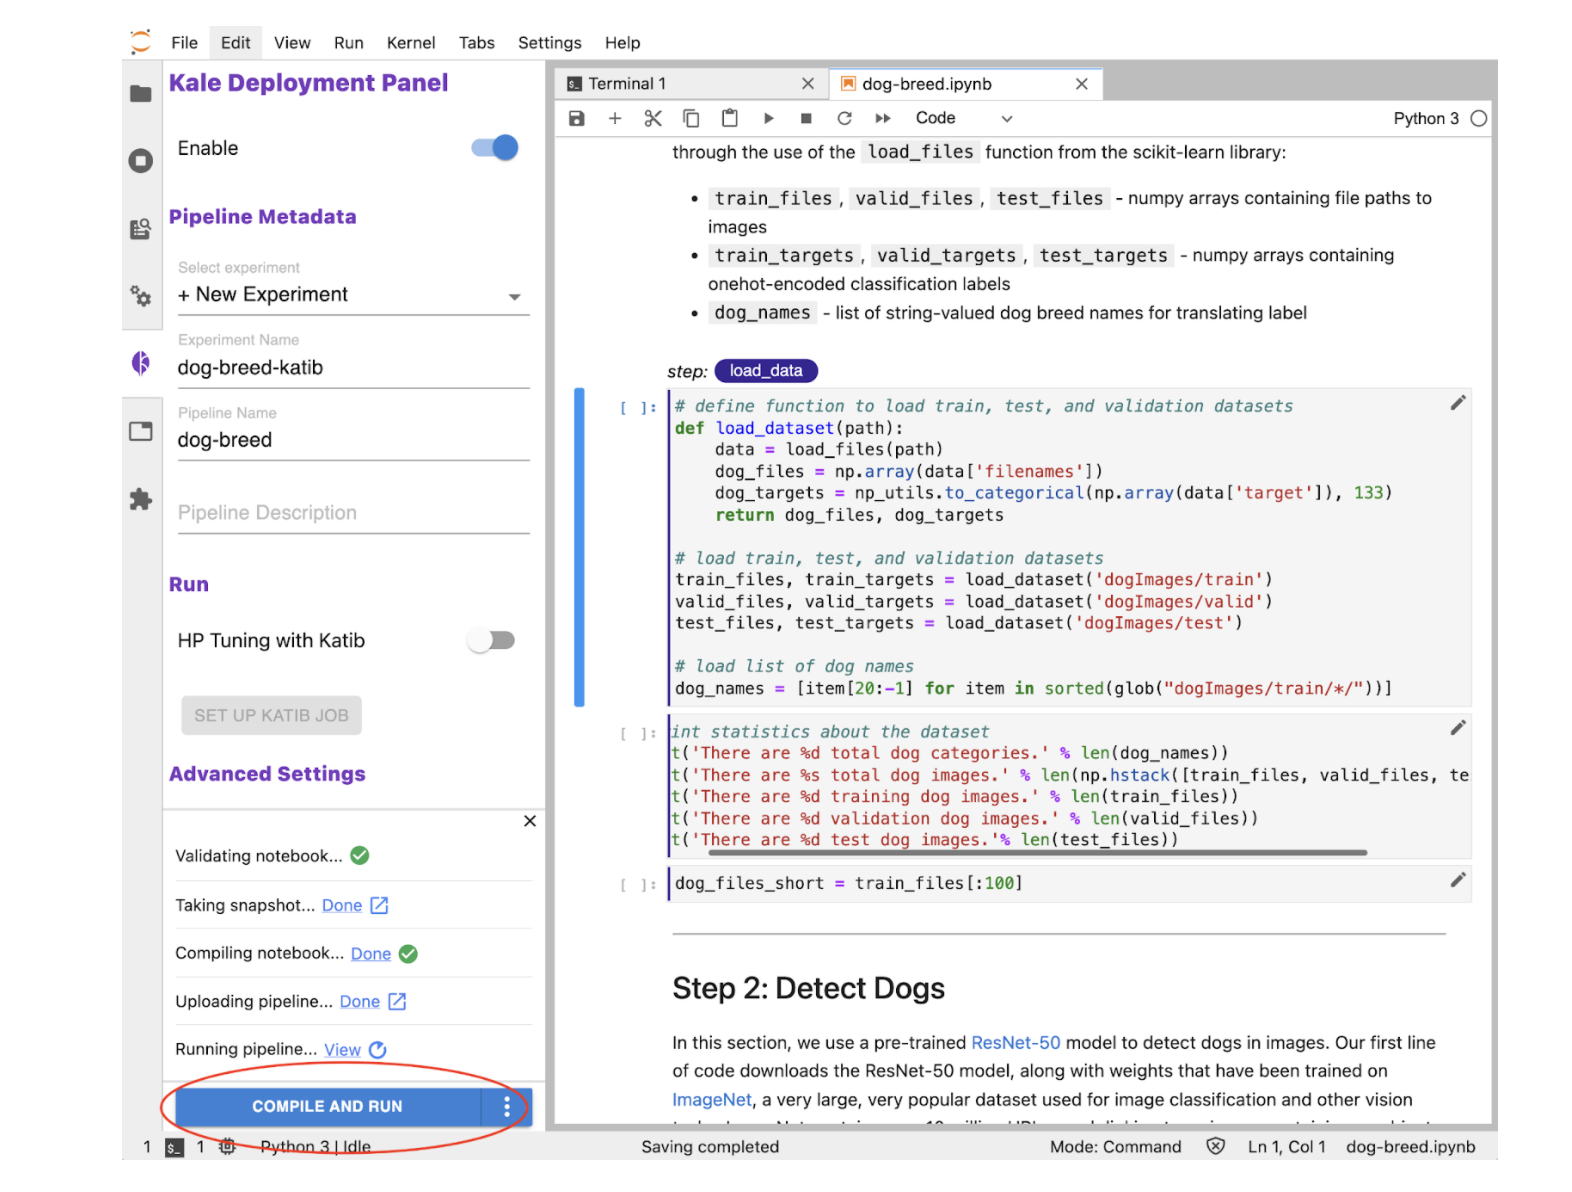
Then, rather than forcing users to go through what would be a somewhat long process of defining the machine learning pipeline within the notebook, they provide a fully annotated notebook that is ready to be compiled and run as a scalable pipeline in Kubernetes.
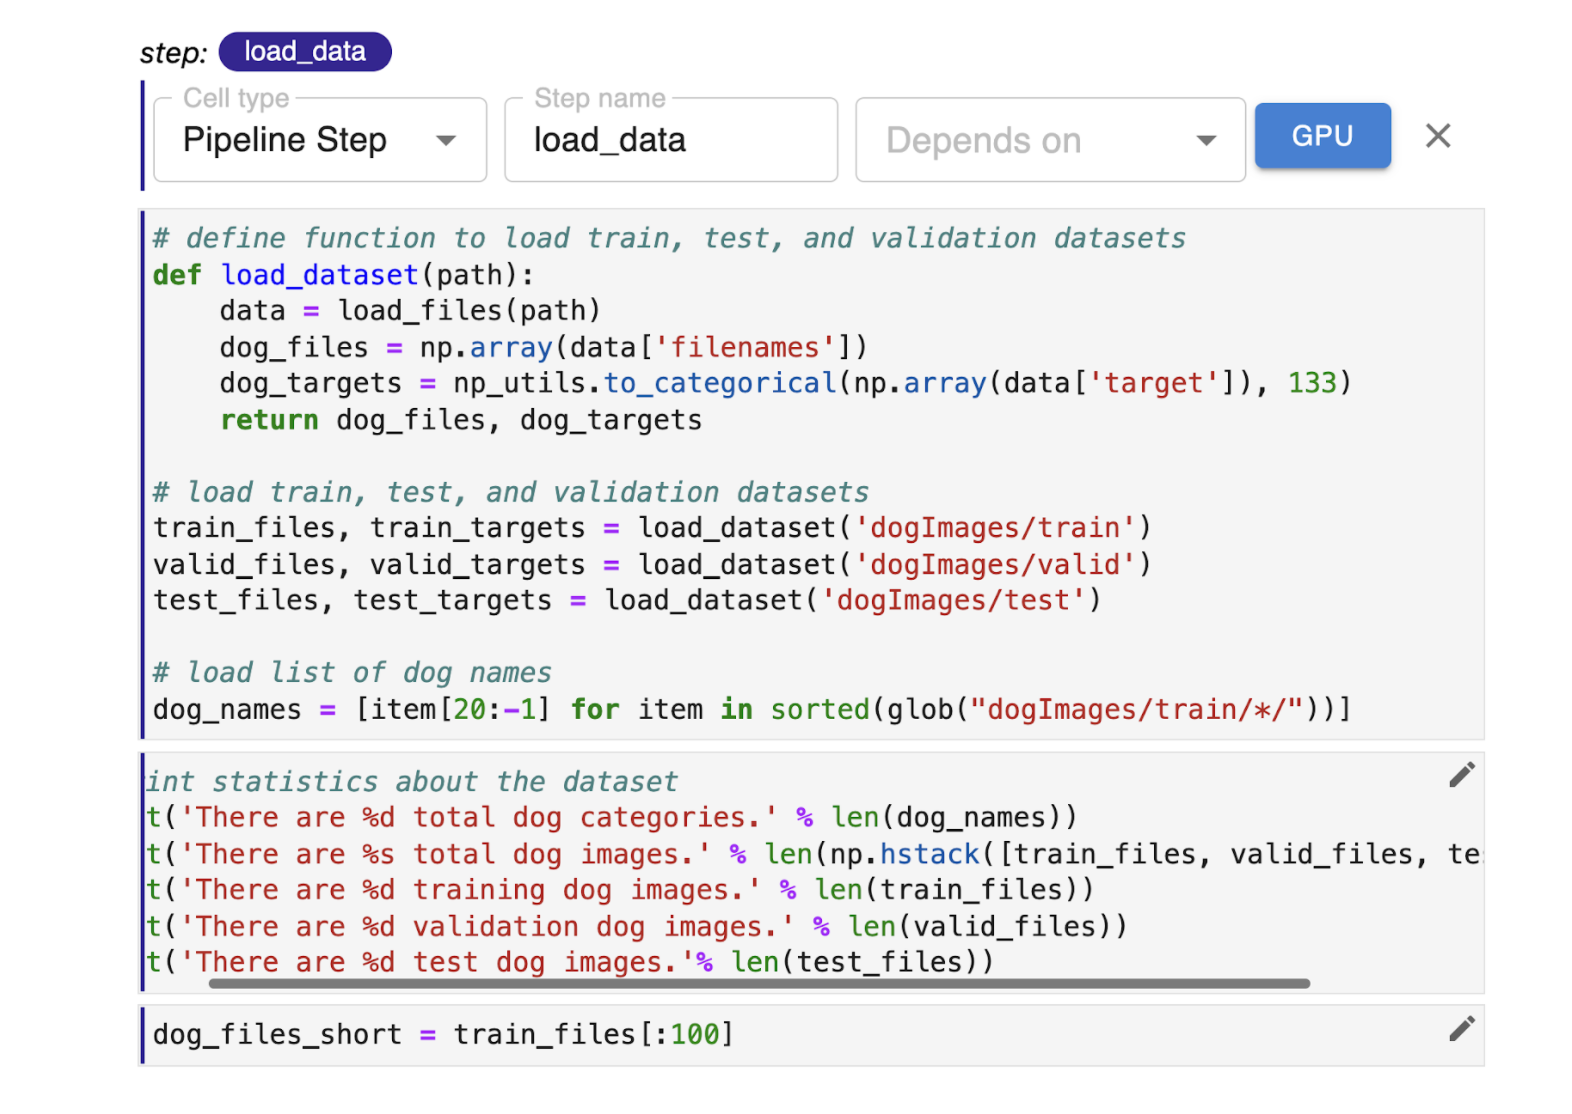
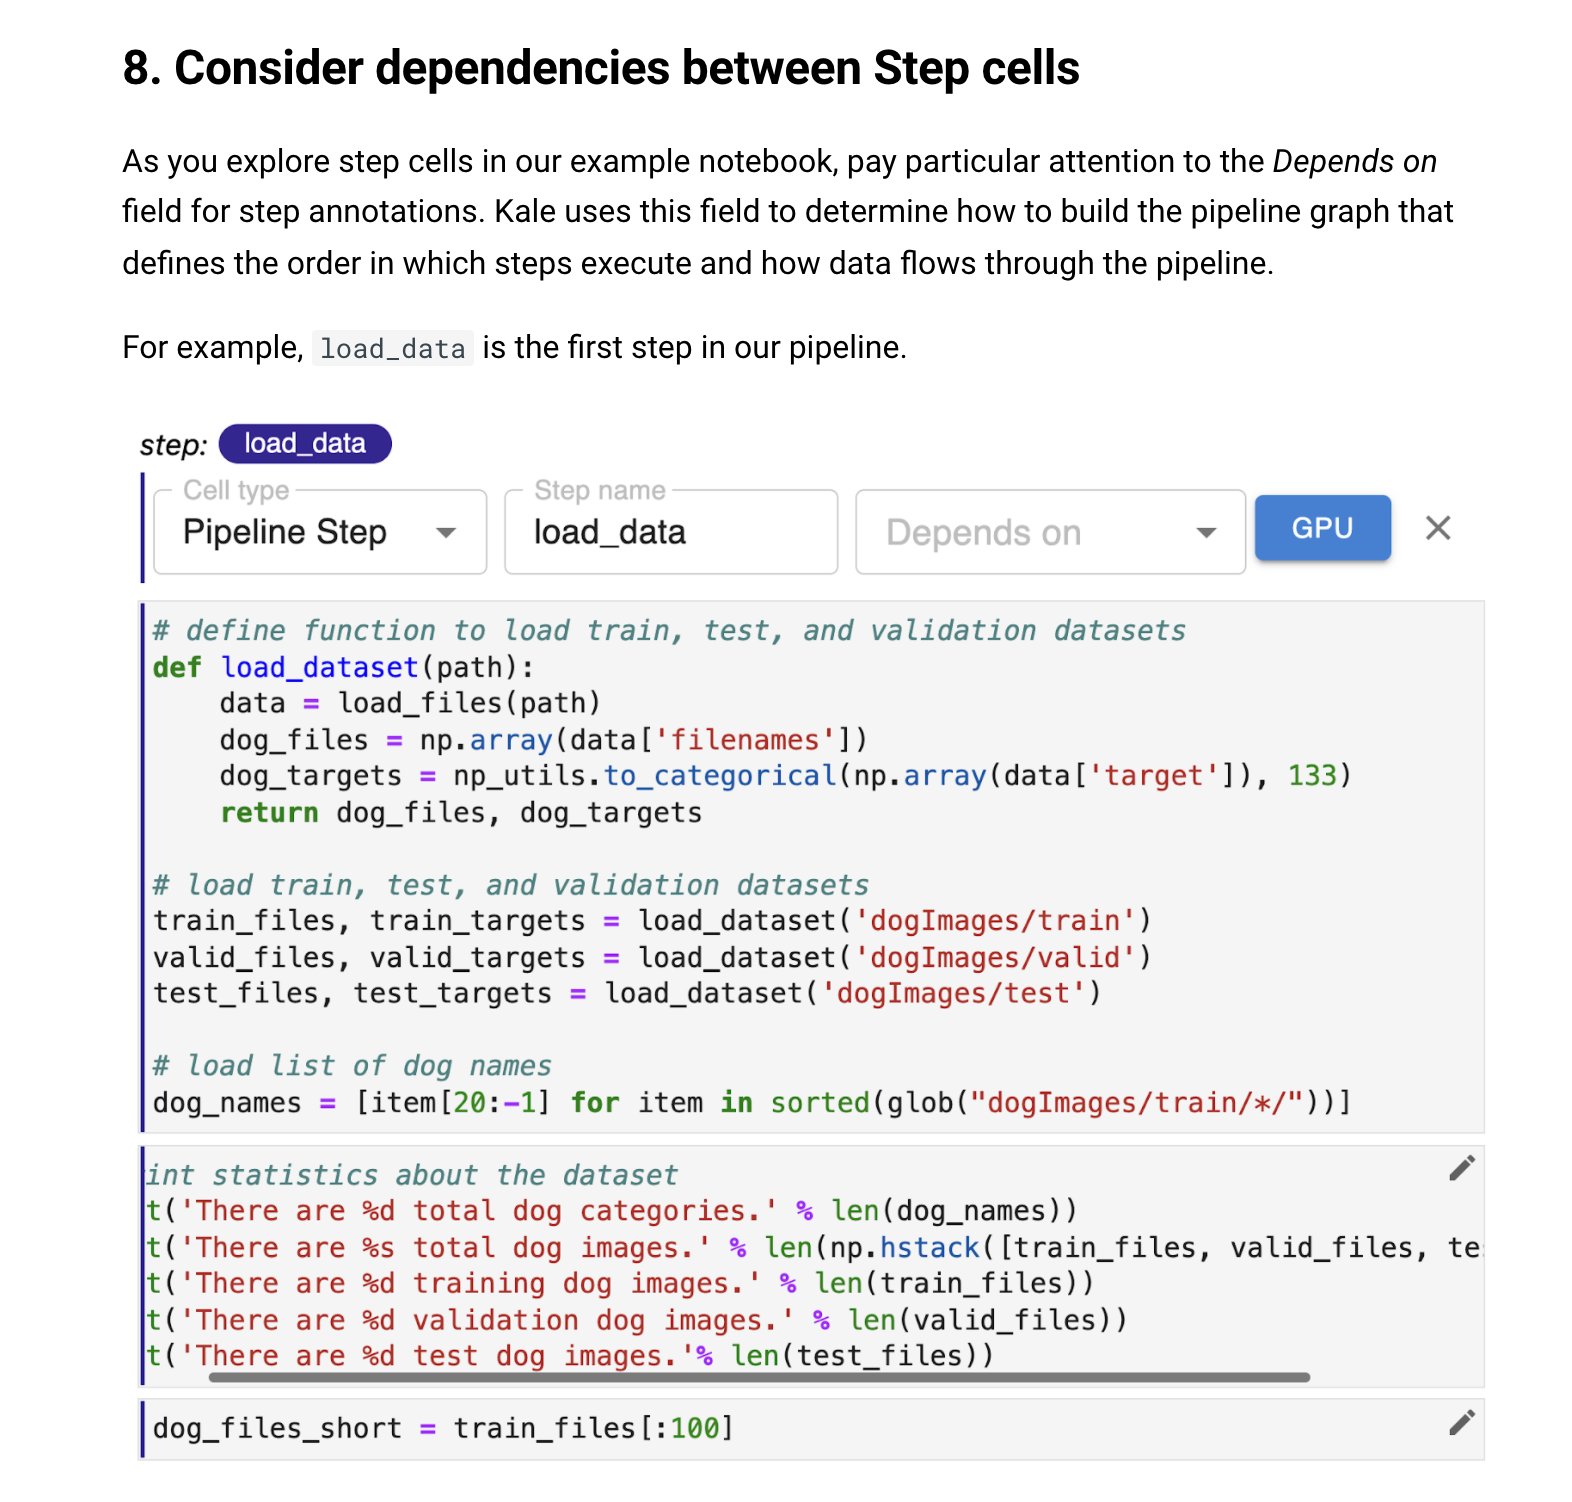
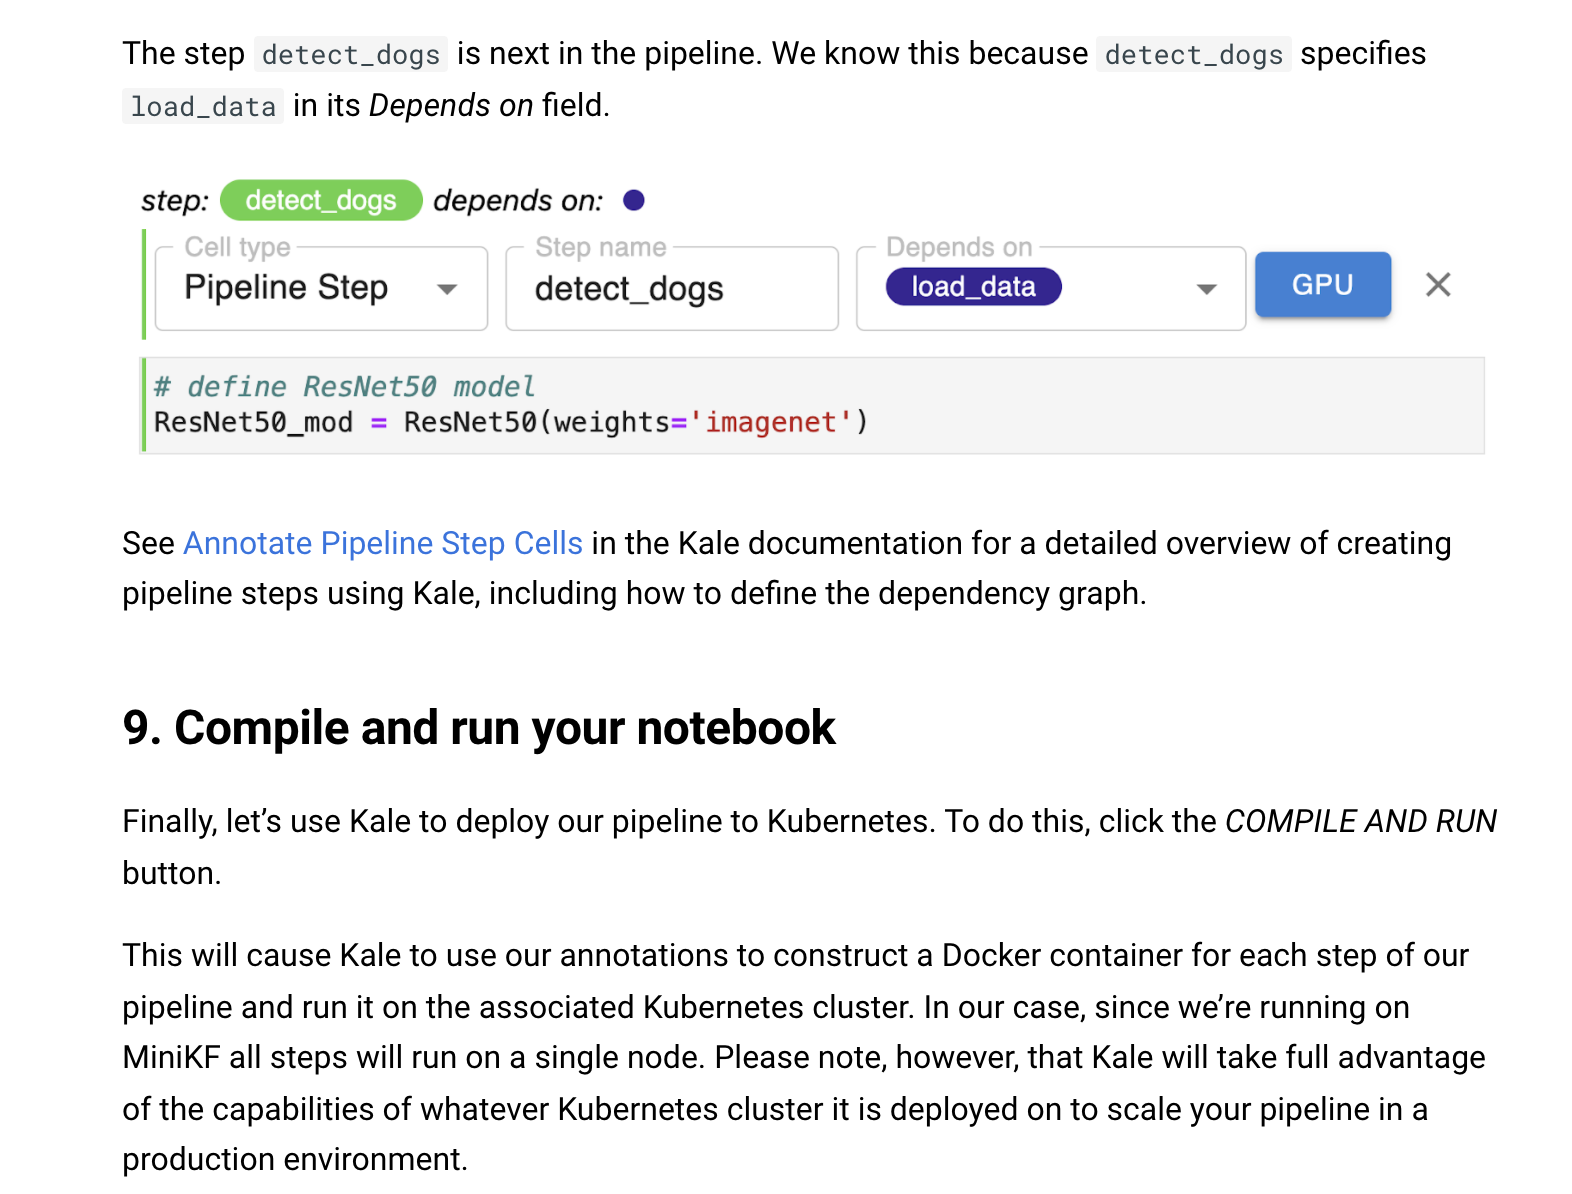
To give users a taste of what it would be like to use Kale, they walk them through some of the key elements of defining a pipeline based on an existing notebook. Principally this involves labeling which cells comprise steps in the pipeline. In addition, they show how one specifies dependencies between steps to define the graph or the way that data will flow through the pipeline.
Using this approach, the authors convey that defining a pipeline using Kale really is very simple and, perhaps most importantly, they demonstrate to any data scientist following this tutorial that it would be easy to pick up an existing notebook they are working with and annotate it using Kale to run machine learning pipelines in production environments.
Your primary goal with a tutorial is to demonstrate how your software takes something that is awful about your target users’ current workflow and transforms it into something that just seems to work the way it should.
A tutorial is not training. You want to bring prospective users to an Aha! moment with a minimum of effort on their part. If you are successful, they will follow up on their tutorial experience by digging into your documentation to learn more about the features you introduced them to.
If your tutorial does its job, users will want to dig deeper. This is where feature documentation comes in. Feature documentation anticipates and addresses the questions users will have about the features you introduce them to in your tutorial. As you are getting your product off the ground, I think it makes the problem of writing documentation more manageable if you write tutorials and feature documentation together.
A tutorial should be focused on providing one main takeaway, but they inevitably touch on several features. For every feature users experience in your tutorial, you need to write supporting feature documentation so that users can explore your product for themselves with their own data and in their own environment.
Use feature documentation to give users the ability to transition from an on-rails experience to off-roading as they explore your product. We’ll cover how to write good feature documentation in detail in a later article. However, the guiding principle is simple. What questions will a new user who encounters a feature for the first time have? Answer all of those questions. It sounds daunting, but in practice, if you do this as you write each new tutorial, it is very manageable.
The Kale tutorial leaves data scientists with the main takeaway that they can define and deploy machine learning pipelines to Kubernetes using Kale all from within a Jupyter notebook. Users will have a variety of questions ranging from specifics about annotating pipeline steps and types of cells to exactly how Kale manages to create containers and run them on Kubernetes. For many of these questions the authors direct users to the Kale feature documentation that will give them answers and enable them to explore Kale functionality for themselves.
These links hint at the availability of more detailed documentation, but do so in a way that is subtle enough that they are easy to put aside until one has finished the tutorial. I encourage you to click through the links included in the tutorial segment above. I’ve added them here for convenience:
As another example, below is the feature documentation for how Kale creates a pipeline step for execution in Kubernetes.
How Kale Creates a Pipeline Step
Kale containerizes pipeline steps for execution on your Kubernetes cluster. Therefore, each pipeline step runs in a separate execution environment.
To organize the code for a pipeline step, Kale creates a new notebook with cells containing the code that the step needs in order to run. The cells Kale creates are as follows, in order:
Kale configures each pipeline step to execute in an iPython environment. This simulates the way your code would execute if you were simply running your Jupyter notebook.
How Kale Marshals Data
Kale will marshal values assigned in Imports and Functions cells so that the data is available in the execution environment for each step of a machine learning pipeline. Changes made to these values are marshalled from step to step as inputs and outputs throughout a pipeline run.
Kale implements backends so that it can marshal objects that cannot be easily stringified. For example, Kale implements specialized backends for PyTorch and scikit-learn objects. Kale’s marshalling backend framework is expandable to accommodate new object types as they are needed.
Tutorials are an effective means of driving awareness of your product. To write a great tutorial you need to put yourself in the mindset of a prospective user who has never seen your product before. An effective tutorial provides an expertly guided experience that demonstrates how your software takes something that is awful about your target users’ current workflow and transforms it into something that just seems to work the way it should. You’ll need to support your tutorial with an easy-to-follow onboarding experience and feature documentation that enables users to get self-serve answers to their questions as they evaluate your product.
